
There are two ways to put a table on a page. For a small, simple table, use the Table menu in the editor. For a large table, one you will update often, or one that staff should be able to sort and search, build it in TablePress and insert it with the Table button. Either way, the table needs header cells so that screen readers can make sense of it.
Tables are for data with rows and columns, such as contact lists, rates and opening hours. Do not use a table to lay out a page in columns: it reads badly on phones and to screen readers.
Add a simple table with the editor’s Table menu
The Table menu is part of the Advanced Editor Tools plugin, which most intranets use. If your editor has no menu bar, see Classic Editor toolbar menu.
- Put the cursor on an empty line where the table should go.
- Open the Table menu above the toolbar, choose Table, and move across the grid to pick the number of columns and rows. Select to insert it.
- Type into the cells. Press Tab to move to the next cell.
- Make the first row a header row, as described in the next section.
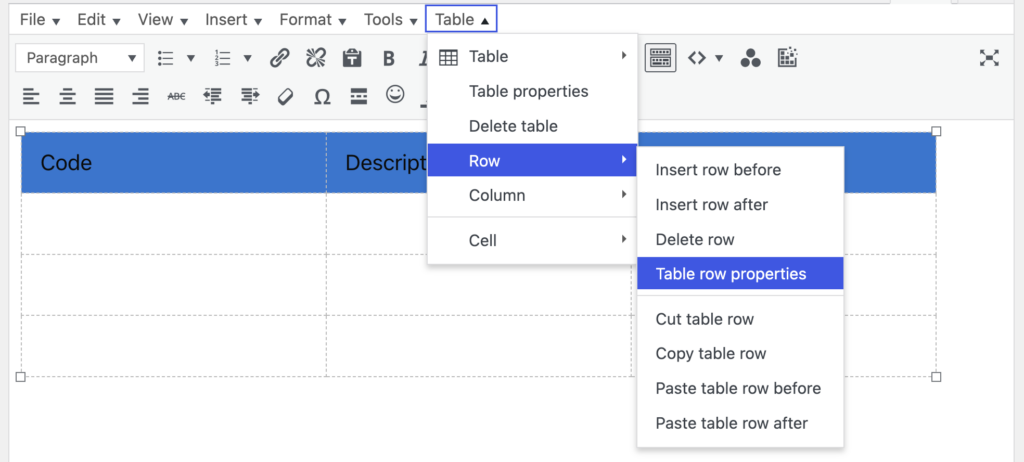
To add or remove rows and columns later, put the cursor in a cell and use Row or Column on the Table menu: insert before or after, or delete. Delete table removes the whole table. Avoid Merge cells: merged cells confuse screen readers and cannot be used with TablePress’s sorting.
Mark the header cells so the table is accessible
A screen reader announces the column heading with each cell only if the heading cells are real header cells, not just bold text.
- Select the cells in the first row by dragging across them.
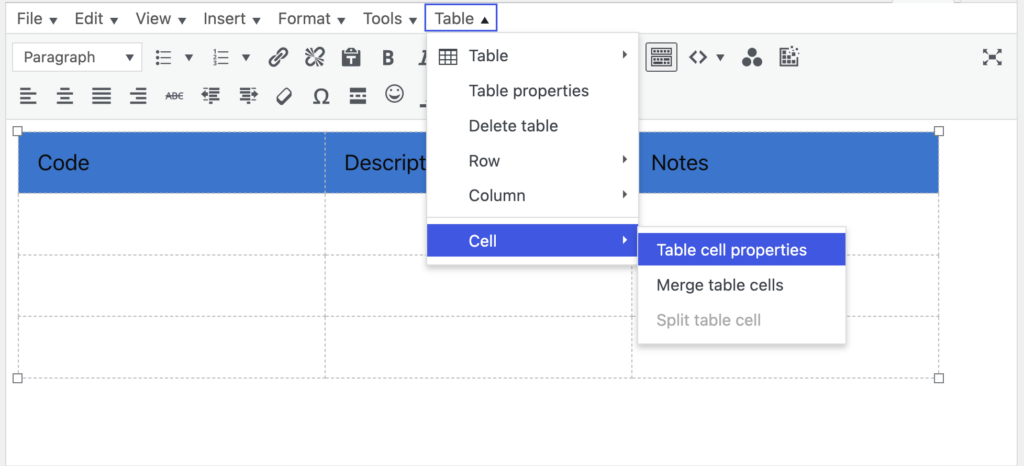
- Open the Table menu, choose Cell, then Cell properties.
- Set Cell type to Header cell and Scope to Column. Select OK.
If the first column holds the name of each row, such as a list of offices, do the same for that column with Scope set to Row. You can also mark the whole first row as a header with Table, Row, Row properties, Row type: Header.
To give the table a visible title, open Table, Table properties, tick Caption and type the title into the caption line that appears above the table. If the Govintra accessibility checks are switched on, WordPress warns you when you save a table with no header cells. See (Govintra) Accessibility checker plus.
Leave the widths alone
Do not drag the table or column edges to resize them. The theme makes every content table fit the width of the page and ignores dragged widths, so the effort is wasted and can leave the editor view looking different from the page. Column widths sort themselves out from the content. Keep cell text short and put long explanations in the text above or below the table.
What happens on phones
The theme styles content tables automatically: a shaded header row, borders between rows and spacing that matches the rest of the intranet. Long words and email addresses wrap rather than widening the table. A table with more columns than fit on a phone screen scrolls sideways inside the page, with a fade at the edge to show there is more. Tables with two or three columns rarely need to scroll, so fewer columns is better.
Insert a TablePress table
TablePress is an optional plugin; see Install plugins. Build or import the table first under TablePress in the admin menu: see Create a new accessible table using TablePress and Create an accessible table from an existing HTML page. Then add it to the page:
- Put the cursor where the table should appear.
- Select the Table button on the first row of the editor toolbar. Its full name, shown when you hover, is Insert a TablePress table.
- A List of Tables pop-up shows your tables with a search box. Select Insert Shortcode beside the one you want.
The shortcode, such as [table id=3 /], is placed in the content. Staff see the finished table in its place. You can also copy the shortcode from the Table Information panel on the table’s edit screen in TablePress and paste it into the editor.
The same table can be inserted on several pages, and updating it in TablePress updates it everywhere. The header row, name and description, sorting and searching are all set on the table in TablePress rather than in the editor.
Choose between the two
- Editor table: a handful of rows, edited in place, no plugin needed.
- TablePress: many rows, reused on more than one page, imported from a spreadsheet or another web page, or needing sorting, filtering and pagination for staff.